Antibody hit selection from NGS data#
This recommended end-to-end workflow guides you through selecting antibody hits from NGS-derived libraries using the Dataset Assay Details page. Each step assumes the previous step’s output is in place.
This walkthrough is task-oriented. For a detailed feature reference of the controls used below like Predict, Clustering, Advanced Filters, and the Antibody settings panel, see comprehensive guide at:doc:/web-app/opmodels/dataset-assay.
Prepare the dataset#
Upload your NGS-derived antibody library as an assay dataset. The platform auto-annotates antibody datasets, including germline assignment, CDR3 extraction, and mutation counts. Wait for the dataset status to reach SUCCESS before continuing to the next step.
Note
Once the dataset reaches SUCCESS, a default UMAP job is queued automatically and you should see it appear in the Jobs panel on the left. The UMAP tab will beempty until that job finishes.
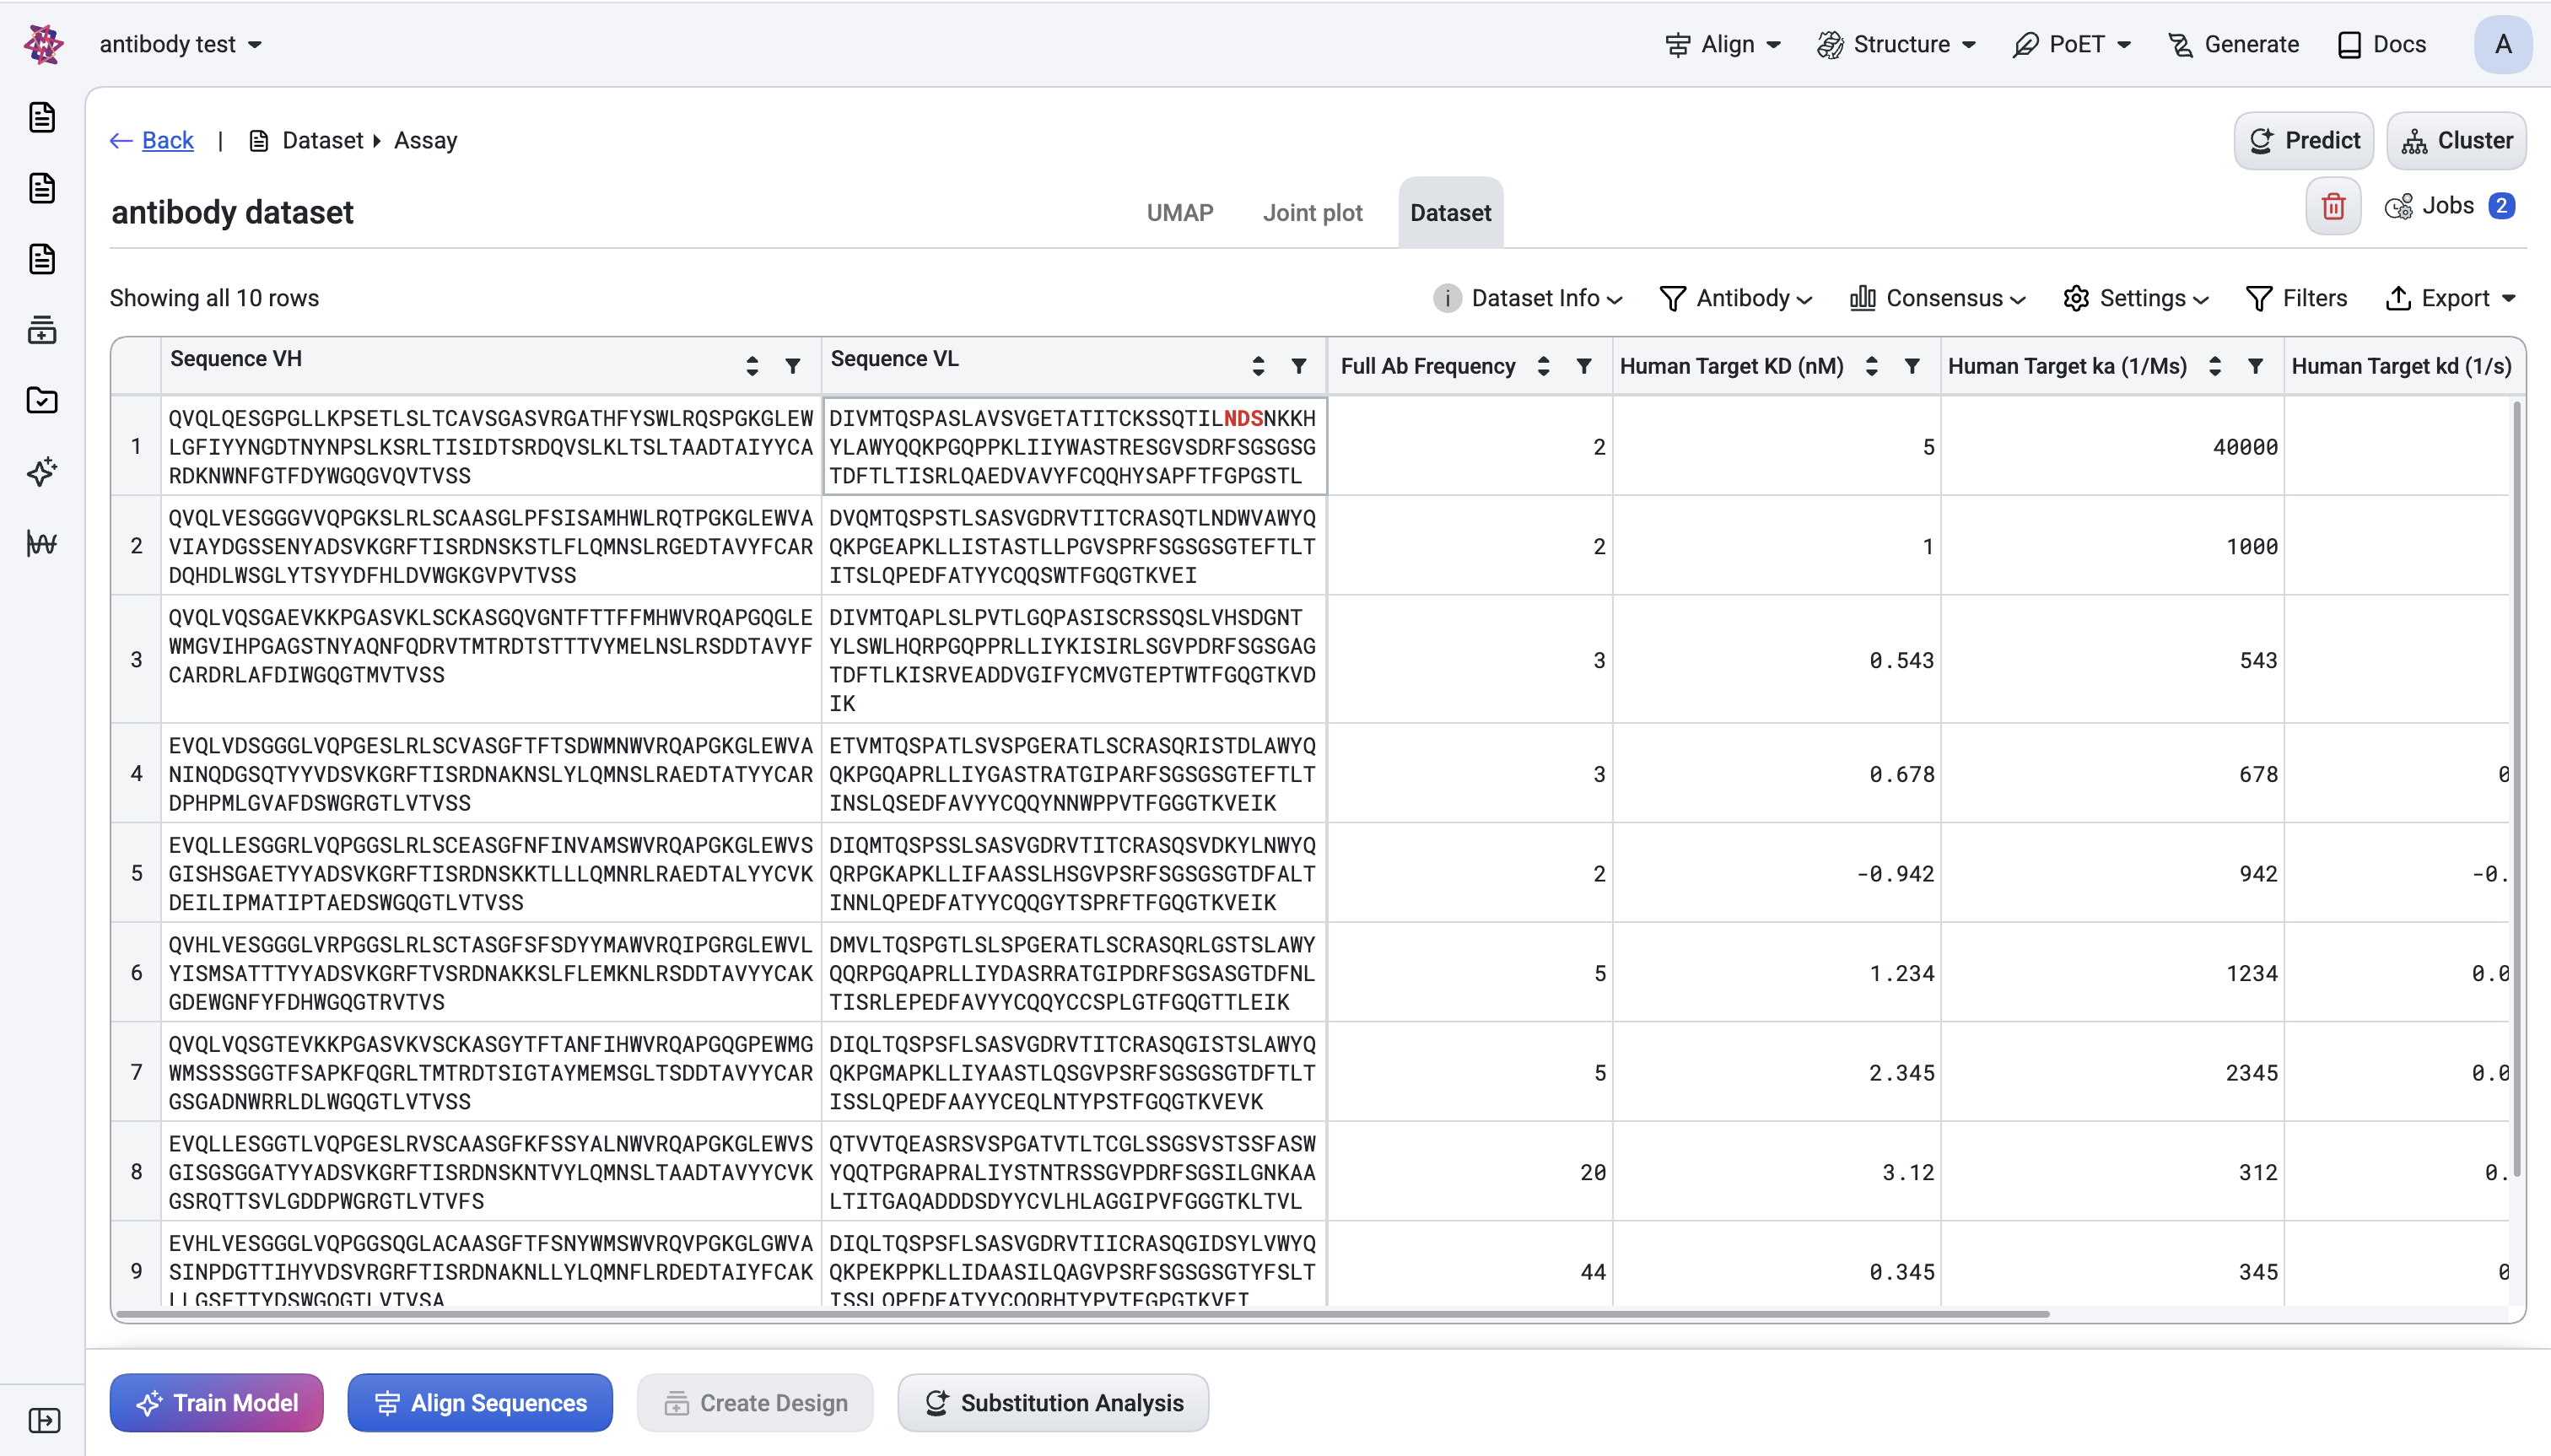
Configure the antibody view#
On the Dataset tab, open the Antibody panel, then configure the following settings:
Set numbering scheme to IMGT: Pick IMGT as the numbering scheme (matches most NGS annotation tools).
Select CDR regions: Tick Show CDR1 / CDR2 / CDR3 so regions are visually obvious in the table.
Align sequences for comparisons: Tick Aligned (and Trim non-standard positions) so VH and VL line up across rows. This required for visual comparison and for the Liabilities column.
Add key annotation colums: Click Customize columns and enable: Heavy V-Gene, Light V-Gene, Germline pair, Total Mutations, CDR3 length, Germline distance (%), Liabilities.
You now have a fully annotated table view of the library.
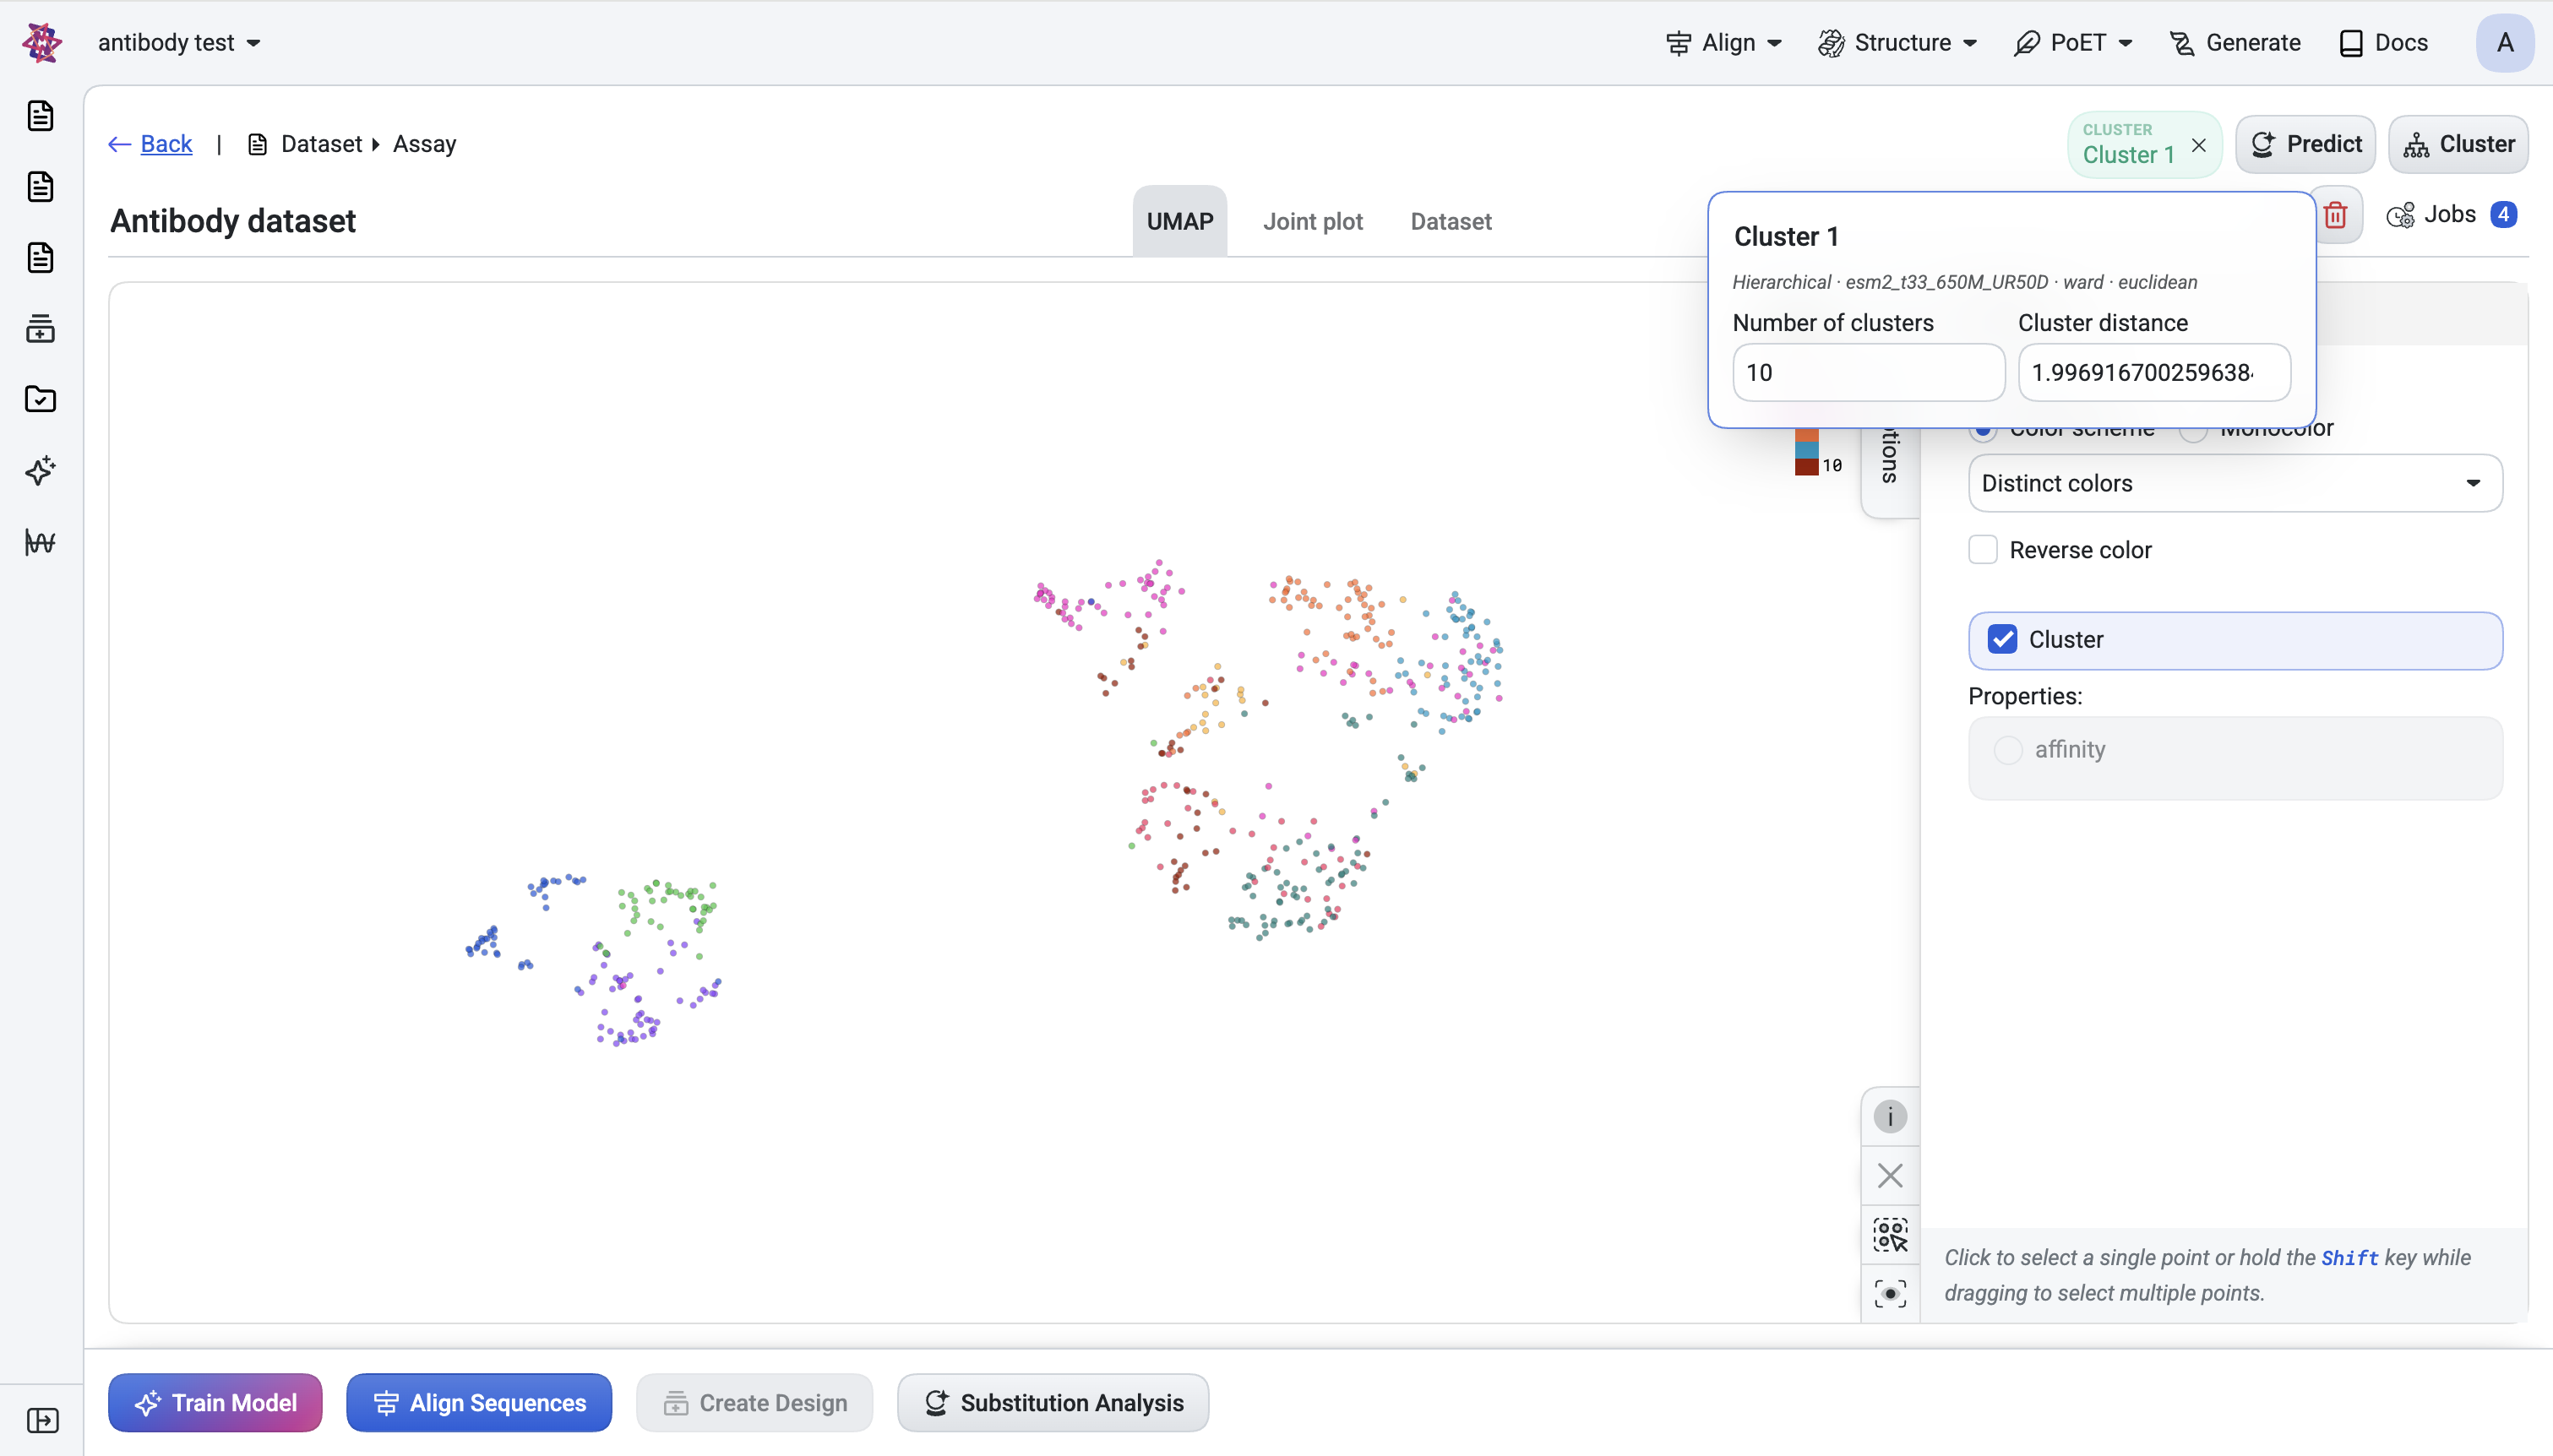
Reduce redundancy with Clustering#
NGS libraries are dominated by closely related clones. Cluster first so downstream steps operate on diverse families.
Initiate Clustering: Cluster → New clustering.
Choose PoET-2: Pick PoET-2 (chain-aware; works for heavy:light pairs).
Use default parameters: Leave Reduction = Mean, Linkage = Ward, Metric = Euclidean unless you have a reason to change.
Submit and Optimize cluster counts: When the chip turns active, open the chip and tune Number of clusters while watching the UMAP. Choose a number that visually separates populations.
You now have a Cluster Number column.
Pre-filter using NGS / antibody metadata#
Open Advanced Filters from the Dataset tab and apply the following filters in sequence to refine your candidate pool:
Quality/abundance gate: Filter on read count or replicate measurement (e.g.
count ≥ N) to drop singletons.Drop liability-heavy clones: (optional). If the Liabilities column flags many rows, sort by this column and exclude the worst candidates.
Germline focus: (optional but common). Filter by Heavy V-Gene / Light V-Gene or Germline Pair to focus on a developability-friendly germline family.
Mutation window: Apply Total Mutations filter (e.g.
≥ 3to skip naive sequences, or≤ 15to skip over-mutated clones) or alternatively, use Germline distance (%) if your sequences differ in length.Enforce CDR3 length constraints: Filter on CDR3 Length to enforce a length range that suits your therapeutic format.
Diversity by cluster: Add
Group by = Cluster NumberandTop K per group = 1–5, sorted by your strongest assay readout. This guarantees that each family has a representative candidate, ensuring your final selection spans the full diversity of the library.
Toggle Show select column if you want to see what got rejected instead of hiding it.
Score with Predict#
With the candidate set narrowed, run a model to rank within it.
Predict → New prediction.
Use your custom model: If you have a trained user model for the property you care about (binding, expression, developability), pick it under User models.
Otherwise, on antibody datasets, the Recommended for you tab proposes preset PoET-2 configurations using the dataset itself as the prompt context — a good default when you have no labels yet.
Submit. A Predict chip appears, and a score column is added.
Scale with parallel predictions: You can run multiple predictions in parallel — for example, one for binding and one for developability. Each gets its own chip and its own column.
Combine signals#
Add a new filter card at the top of your existing filter stack to prioritize high-scoring candidates:
Column =
<your prediction>· Operator =≥· Value =<threshold>
Or sort: Sort by <prediction> Desc, Top K = 96.
Multi-criteria selection: If you ran two predictions, stack two filter cards (one per score) to require both signals — e.g., high binding score AND high developability score.
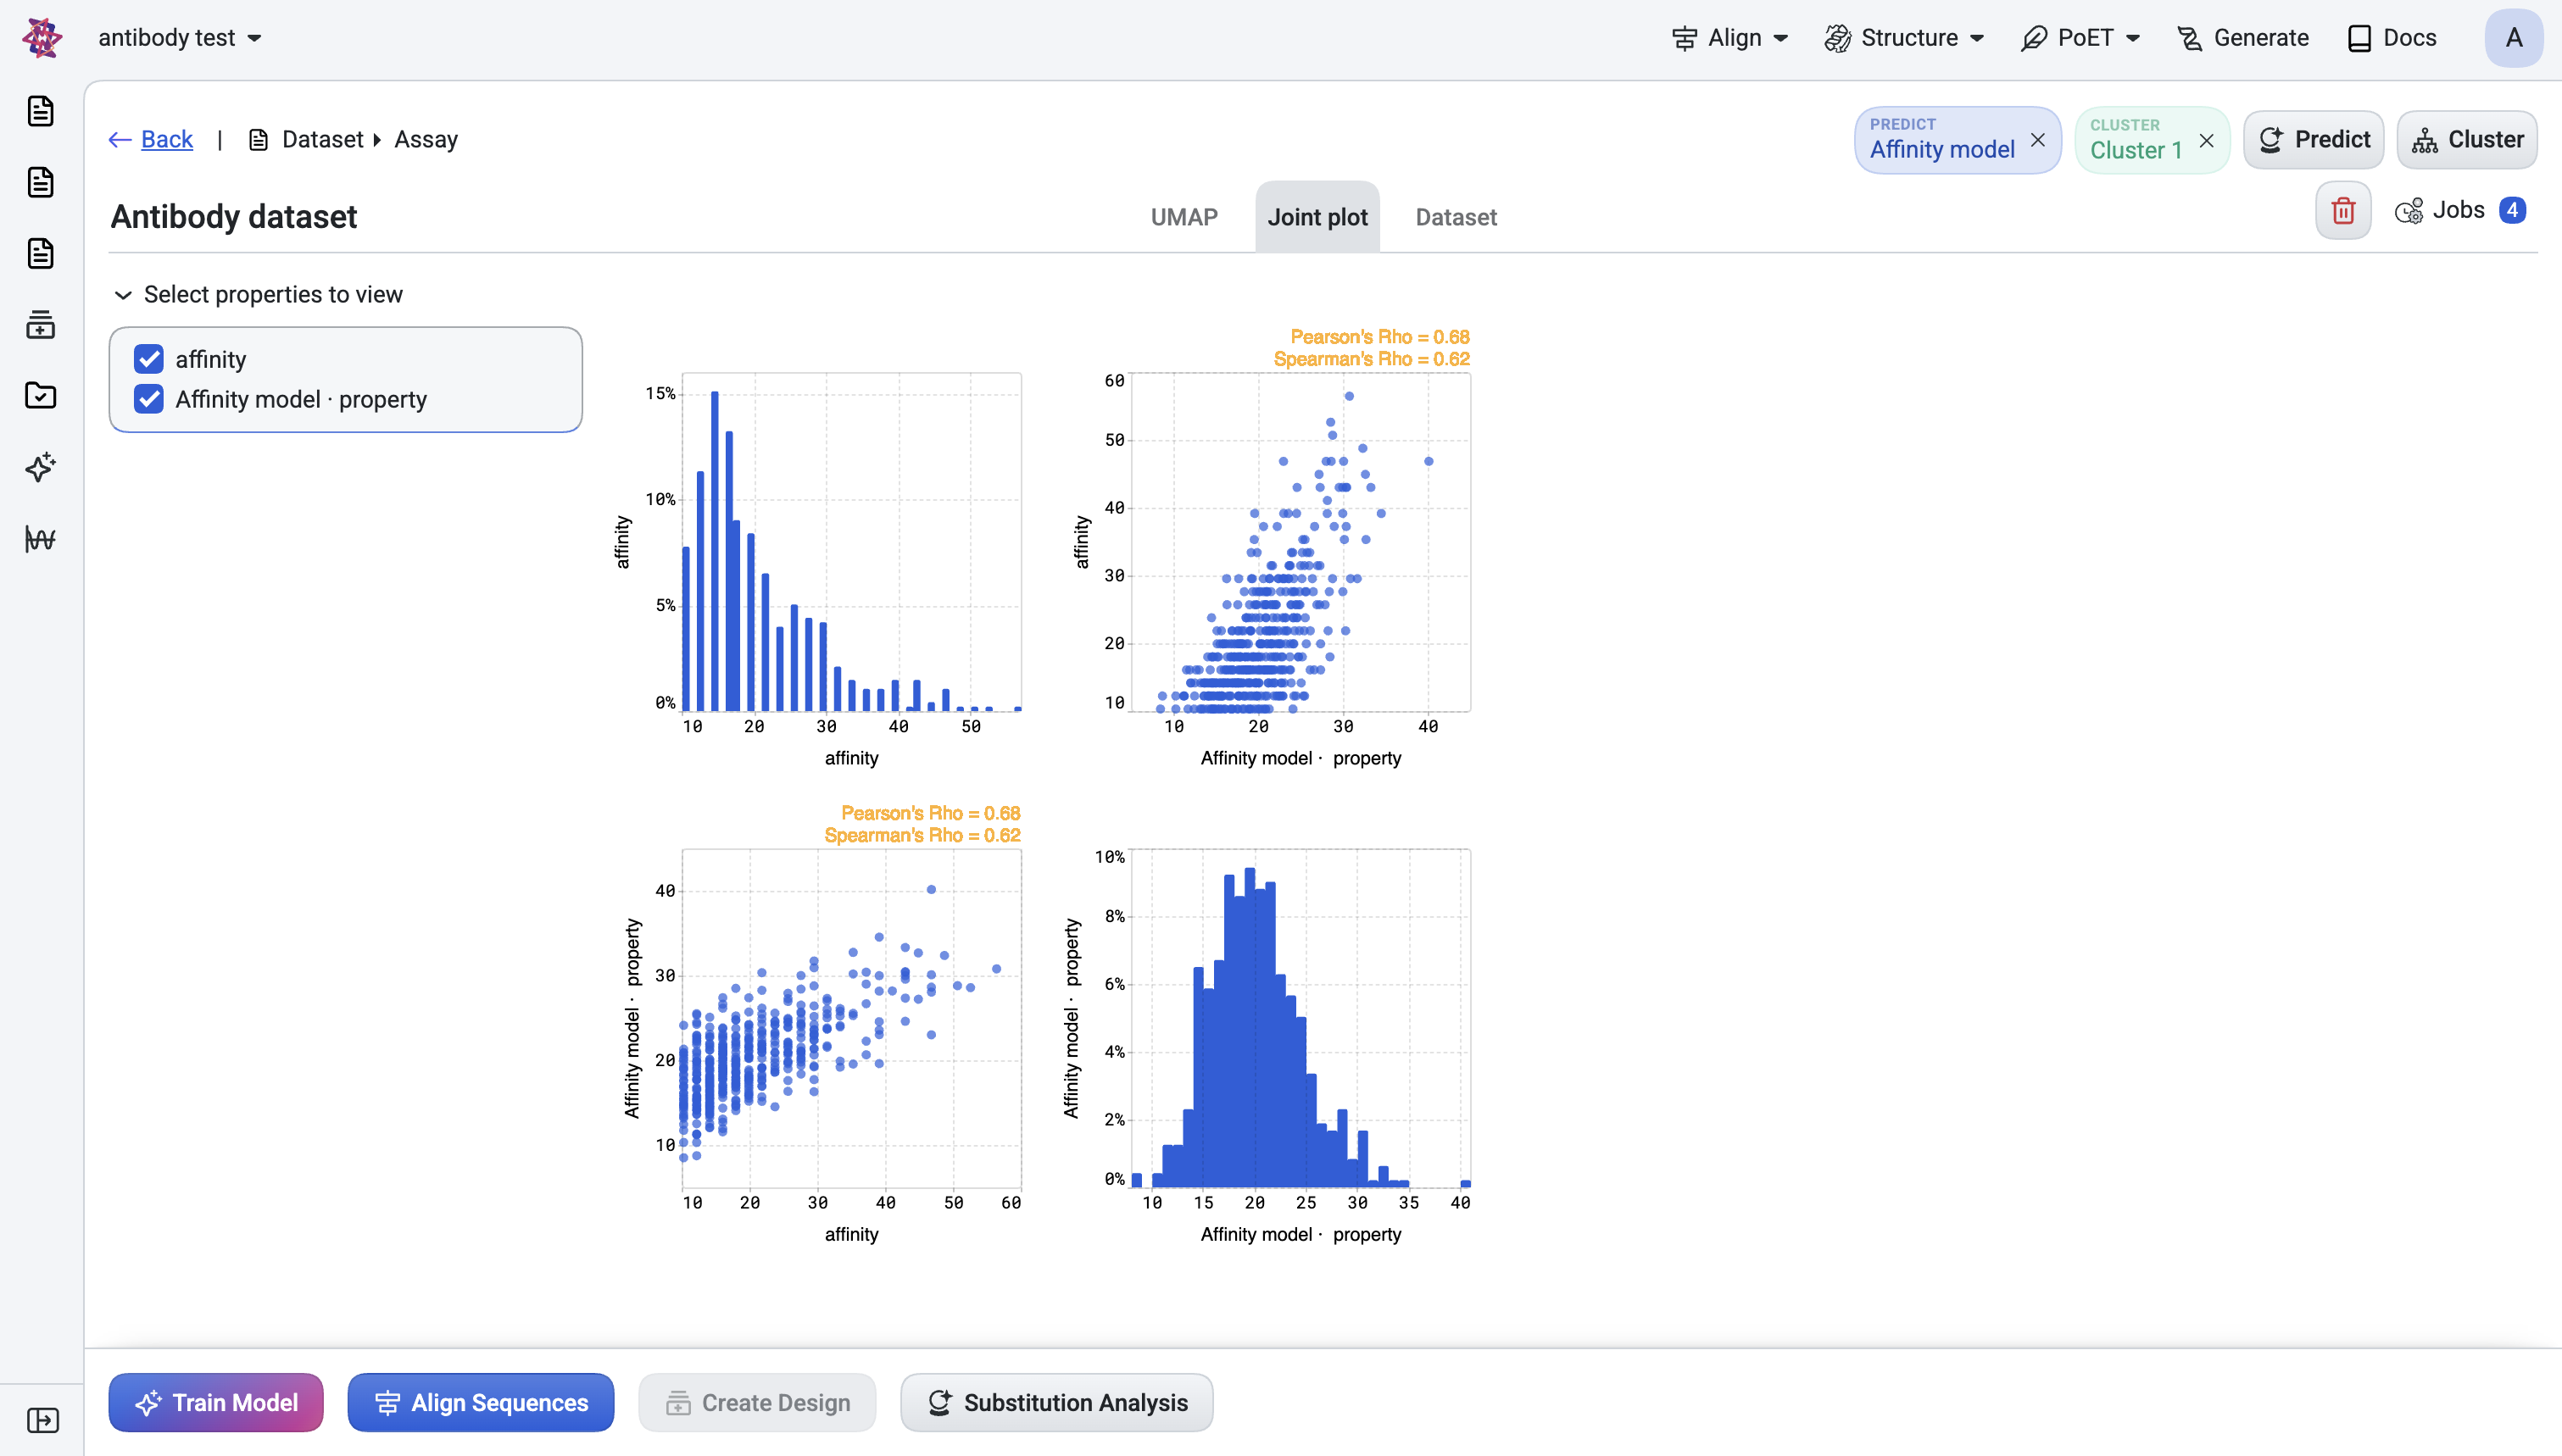
Inspect visually#
Use the built-in visualization tools to validate your filtered candidate set and explore relationships between key metrics:
UMAP visualization — Review the scatter plot with points colored by cluster assignment and toggle the prediction score as an alternative color axis. Confirm the surviving candidates are spread across the embedding space rather than clustered in a single region, ensuring you’ve maintained diversity.
Joint plot — Examine pairwise relationships, e.g., prediction score vs. CDR3 length, or score-A vs. score-B.
Interactive filtering - All visualizations respect the active filters: filtered-out sequences appear dimmed while selected candidates remain highlighted. Selecting points in the UMAP also selects the corresponding rows in the table, and vice versa.
Export the hit list#
Return to the Dataset tab, where your shortlisted and validated candidates are present. Next steps options:
Iterate with machine learning: Train a new model on the selected rows (footer Train model action) for an iterative round.
Proceed to wet-lab validation: Export the candidate table for ordering or expermimental wet-lab follow-up.
Quick decision guide#
Goal |
Use |
|---|---|
See CDRs / aligned heavy + light side-by-side |
Antibody panel → CDR checkboxes + Aligned + IMGT |
Add germline / mutation columns to the table |
Antibody panel → Customize columns |
Remove near-duplicate clones from NGS |
Cluster + filter |
Restrict to a germline family |
Advanced Filter on |
Filter out clones with developability liabilities |
Antibody panel → enable Liabilities column, then sort/exclude |
Rank by predicted property |
Predict + sort by score column |
Combine binding + developability |
Two Predict runs + two filter cards |
See structure of the library |
UMAP tab, coloured by |
See pairwise tradeoffs |
Joint plot with two prediction scores as axes |